I’ve been so busy with other projects over the past 6 months that I’ve only just got round to checking out the new ASP.NET Identity Libraries.
After writing my own identity/membership library to accomodate for the features missing from the old ASP.NET membership system, I was quite keen to see how ASP.NET Identity stacks up, and whether I can move our existing applications over to this new framework.
If you’ve felt the pain of rolling your own OpenID/OAuth implementation using DotNetOpenAuth the good news is that it’s now easier than ever to set up both internal and external auth using the new ASP.NET project templates available in Visual Studio 2013. A big thanks to the ASP.NET team for this!
That said, if you’re reviewing the templates in order to understand how to add some of the new identity features to an existing application (as I am) they can be a little confusing.
This post covers setting up cookie based authentication (the replacement for Forms Authentication) using the new ASP.NET Identity Libraries and nothing else. You’ll find the source on GitHub.
Project Setup
To begin with create an Empty ASP.NET MVC web application:
- Go to File > New Project and choose “ASP.NET Web Application”
- On the ASP.NET template dialog choose the “Empty” template and select MVC:
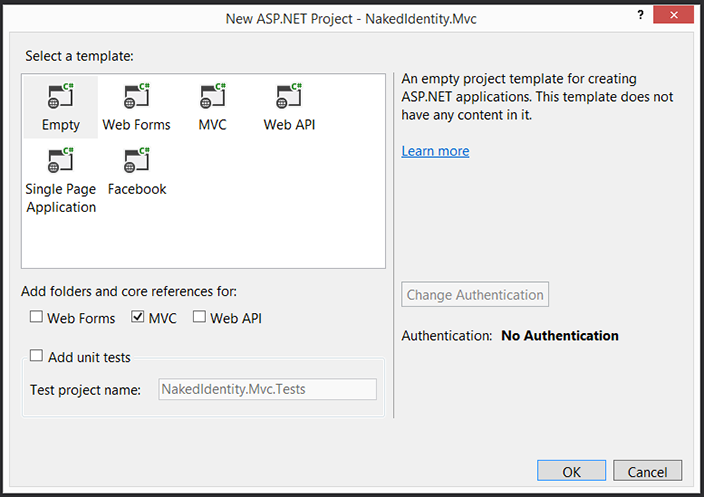
This will set up a bare bones ASP.NET MVC application.
Install NuGet packages
All of the new ASP.NET Identity libraries are available on NuGet. To perform Cookie based authentication we only need to install 2 packages:
Microsoft.Owin.Host.SystemWeb - ASP.NET Identity is actually built on top of OWIN which means the same identity features can be used for any OWIN supporting framework such as Web API and SignalR. This package enables OWIN middleware to hook into the IIS request pipeline
Install-Package Microsoft.Owin.Host.SystemWebMicrosoft.Owin.Security.Cookies - This is the package that actually enables cookie based authentication.
Install-Package Microsoft.Owin.Security.Cookies
Bootstrapping OWIN
To initialize the OWIN identity components we need to add a Startup class to the project with a method Configuration that takes an OWIN IAppBuilder instance as a parameter. This class will be automatically located and initialized by the OWIN host:
using Microsoft.Owin;
using Microsoft.Owin.Security.Cookies;
using Owin;

namespace NakedIdentity.Mvc
{
    public class Startup
    {
        public void Configuration(IAppBuilder app)
        {
            app.UseCookieAuthentication(new CookieAuthenticationOptions
            {
                AuthenticationType = "ApplicationCookie",
                LoginPath = new PathString("/auth/login")
            });
        }
    }
}
The UseCookieAuthentication extension tells the ASP.NET Identity framework to use cookie based authentication. We need to set 2 properties:
AuthenticationType- This is a string value that identifies the the cookie. This is necessary since we may have several instances of the Cookie middleware. For example, when using external auth servers (OAuth/OpenID) the same cookie middleware is used to pass claims from the external provider. If we’d pulled in theMicrosoft.AspNet.IdentityNuGet package we could just use the constantDefaultAuthenticationTypes.ApplicationCookiewhich has the same value - “ApplicationCookie”.LoginPath- The path to which the user agent (browser) should be redirected to when your application returns an unauthorized (401) response. This should correspond to your “login” controller. In this case I have anAuthContollerwith aLogInaction.
Secure by Default
It is good practice to make your appliation secure by default and then whitelist the controllers/actions that allow anonymous access. To do this we’ll add the built in AuthorizeAttribute as a global filter.
Create the following class:
using System.Web.Mvc;

namespace NakedIdentity.Mvc
{
    public class FilterConfig
    {
        public static void RegisterGlobalFilters(GlobalFilterCollection filters)
        {
            filters.Add(new HandleErrorAttribute());
            filters.Add(new AuthorizeAttribute());
        }
    }
}
And register it in global.asax.cs Application_Start:
protected void Application_Start()
{
    AreaRegistration.RegisterAllAreas();
    RouteConfig.RegisterRoutes(RouteTable.Routes);
    FilterConfig.RegisterGlobalFilters(GlobalFilters.Filters);
}
Create a “protected” resource
So that we have something to log in for, we’ll create a protected page. Add the following controller:
public class HomeController : Controller
{
    public ActionResult Index()
    {
        return View();
    }
}
Add a corresponding view:
@{
    ViewBag.Title = "Home";
}

<h2>Home</h2>
Create the Auth controller
Now we’ll create the Auth controller and action where the user will be redirected when they need to log in:
[AllowAnonymous]
public class AuthController : Controller
{
    public ActionResult LogIn()
    {
        return View();
    }
}
Note the [AllowAnonymous] attribute which makes the controller available to anonymous users (necessary so people can actually log in).
Add a corresponding view:
@{
    ViewBag.Title = "Log In";
}

<h2>Log In</h2>
Run the application
Since we’ve created a “Home” controller with an “Index” action which happens to be the default route configured within App_Start/RouteConfig.cs when we request / we’ll actually be redirected to the login page since the HomeController is a protected resource.
The address in your browser will look something like:
http://localhost:1464/auth/login?ReturnUrl=%2F
Logging in
Now we need to enable our users to log in. First we’ll create a class that represents a request to log in:
public class LogInModel
{
    [Required]
    [DataType(DataType.EmailAddress)]
    public string Email { get; set; }

    [Required]
    [DataType(DataType.Password)]
    public string Password { get; set; }

    [HiddenInput]
    public string ReturnUrl { get; set; }
}
We’re using a few data annotation attributes to provide metadata about each property so that we can use some of MVC’s HTML helpers to build the login form.
Now we’ll update the AuthController, first our GET action (GET /auth/login) that will display the login page:
[HttpGet]
public ActionResult LogIn(string returnUrl)
{
    var model = new LogInModel
    {
        ReturnUrl = returnUrl
    };

    return View(model);
}
Just like the existing Forms Authentication module, the url of the protected resource that the user attempted to access is sent as a returnUrl querystring parameter. We need to ensure this is passed to us when the user submits the login form so it stored in the LogInModel and rendered as a hidden input on the page.
Now we’ll add the POST action (POST /auth/login) that validates the provided credentials and logs the user in:
[HttpPost]
public ActionResult LogIn(LogInModel model)
{
    if (!ModelState.IsValid)
    {
        return View();
    }

    // Don't do this in production!
    if (model.Email == "admin@admin.com" && model.Password == "password")
    {
        var identity = new ClaimsIdentity(new[] {
                new Claim(ClaimTypes.Name, "Ben"),
                new Claim(ClaimTypes.Email, "a@b.com"),
                new Claim(ClaimTypes.Country, "England")
            },
            "ApplicationCookie");

        var ctx = Request.GetOwinContext();
        var authManager = ctx.Authentication;

        authManager.SignIn(identity);

        return Redirect(GetRedirectUrl(model.ReturnUrl));
    }

    // user authN failed
    ModelState.AddModelError("", "Invalid email or password");
    return View();
}

private string GetRedirectUrl(string returnUrl)
{
    if (string.IsNullOrEmpty(returnUrl) || !Url.IsLocalUrl(returnUrl))
    {
        return Url.Action("index", "home");
    }

    return returnUrl;
}
We’re doing some very crude authentication logic at the moment, checking if the provided credentials match hardcoded values. In a future post we’ll make use of the new ASP.NET Identity UserManager to authenticate against user information stored in a database. The intestesting code is what happens when we’ve validated the credentials.
First we create a
ClaimsIdentityobject that contains information (Claims) about the current user. What’s particularly interesting about the new Claims based approach is that the Claims are persisted to the client inside the authentication cookie. This means that you can add claims for frequently accessed user information rather than having to load it from a database on every request. This is similar to what we had with Federated Identity’s Session Authentication Module (SAM). Note that we also provide the authentication type. This should match the value you provided in theStartupclass.Next we get obtain an
IAuthenticationManagerinstance from the current OWIN context. This was automatically registered for you during startup.Then we call
IAuthenticationManager.SignInpassing the claims identity. This sets the authentication cookie on the client.Finally we redirect the user agent to the resource they attempted to access. We also check to ensure the return URL is local to the application to prevent Open Redirection attacks.
Finally we just need to update the LogIn.cshtml view:
@model NakedIdentity.Mvc.ViewModels.LogInModel
@{
  ViewBag.Title = "Log In";
}

<h2>Log In</h2>

@Html.ValidationSummary(true)

@using (Html.BeginForm())
{
  @Html.EditorForModel()
  <p>
    <button type="submit">Log In</button>
  </p>
}
Run the application
Try logging in. If you use valid credentials (admin@admin.com/password) you’ll be logged in and redirected to the home page.
But how do we know we’re logged in?
Add the following to Home view:
<p>
  Hello @User.Identity.Name
</p>
Refresh and you should have the following:
Hello Ben
Logging Out
Of course it would a pretty half-arsed login system if we didn’t allow users to Log Out. Add the following action to AuthController:
public ActionResult LogOut()
{
    var ctx = Request.GetOwinContext();
    var authManager = ctx.Authentication;

    authManager.SignOut("ApplicationCookie");
    return RedirectToAction("index", "home");
}
Again we obtain the IAuthenticationManager instance from the OWIN context, this time calling SignOut passing the authentication type (so the manager knows exactly what cookie to remove).
We can then add a Log Out link to the home page:
<p>
  <a href="@Url.Action("logout", "auth")">Log Out</a>
</p>
Accessing custom claim data
Whilst claims based principals/identities have been used in ASP.NET for a while, the current user is still exposed as IPrincipal/IIdentity this means all we can really get from the User property in our controllers and views is the Name claim.
To access other claims else we can cast the current user identity as a ClaimIdentity. Update the Index action in HomeController to the following:
public ActionResult Index()
{
    var claimsIdentity = User.Identity as ClaimsIdentity;
    ViewBag.Country = claimsIdentity.FindFirst(ClaimTypes.Country).Value;

    return View();
}
Then update the Home/Index.cshtml view:
<p>
  Hello @User.Identity.Name. How's the weather in @ViewBag.Country?
</p>
You should then get the following output on the page:
Hello Ben. How’s the weather in England?
The smarter way
Having to do this every time you need access to user claims is a bit of a smell. Wouldn’t it be nice if you had strongly typed access to your user claims?
To do this we’ll create our own Principal class that wraps the current ClaimsPrincipal and provides strongly typed properties to it’s underlying claims:
public class AppUser : ClaimsPrincipal
{
    public AppUser(ClaimsPrincipal principal)
        : base(principal)
    {
    }

    public string Name
    {
        get
        {
            return this.FindFirst(ClaimTypes.Name).Value;
        }
    }

    public string Country
    {
        get
        {
            return this.FindFirst(ClaimTypes.Country).Value;
        }
    }
}
Next we’ll add a base controller that provides access to AppUser:
public abstract class AppController : Controller
{
    public AppUser CurrentUser
    {
        get
        {
            return new AppUser(this.User as ClaimsPrincipal);
        }
    }
}
Finally we can update HomeController like so:
public class HomeController : AppController
{
    public ActionResult Index()
    {
        ViewBag.Country = CurrentUser.Country;
        return View();
    }
}
Much nicer. But we can still do better. Why do we need to add this information to ViewBag when we already have access to the current user within our view?
Let’s create a custom base view page for our Razor views that provides access to our AppUser principal:
public abstract class AppViewPage<TModel> : WebViewPage<TModel>
{
    protected AppUser CurrentUser
    {
        get
        {
            return new AppUser(this.User as ClaimsPrincipal);
        }
    }
}

public abstract class AppViewPage : AppViewPage<dynamic>
{
}
Open up /views/web.config and the set the pageBaseType:
<system.web.webPages.razor>
  <pages pageBaseType="NakedIdentity.Mvc.AppViewPage">
Rebuild the project and update the Index.cshtml view:
<p>
  Hello @CurrentUser.Name. How's the weather in @CurrentUser.Country?
</p>
HomeController can now be simplified to just return the view:
public ActionResult Index()
{
    return View();
}
Done!
We now have cookie based authentication implemented in ASP.NET MVC using the new ASP.NET Identity libraries.
In my next post I’ll replace our very suspect authentication mechanism (hardcoded values) and also provide a way for users to register.
You can download the latest code from GitHub