Without proper guidance, multi-tenancy can be difficult to implement. This was especially the case with previous versions of ASP.NET where its fragmented stack of frameworks led to several possible implementations. It became even more complex if you were using multiple ASP.NET frameworks within the same application (MVC, Web API, SignalR).
Fortunately things improved with OWIN and it was this that led to me starting SaasKit; a toolkit designed to make SaaS (Software as a Service) applications much easier to build. With OWIN middleware it was possible to introduce behaviour into the HTTP pipeline no matter what framework was being used (providing the underlying host was OWIN compatible).
Things have got better still with ASP.NET Core 1.0 (previously ASP.NET 5) and since it uses middleware in a similar way to OWIN, we were able to get SaasKit up and running pretty quickly (thanks to saan800 who paved the way).
Getting Started
Create a new ASP.NET 5 application and add a reference to SaasKit.Multitenancy (available on NuGet) in your project.json file:
 "dependencies": {
   ...
   "SaasKit.Multitenancy": "1.0.0-alpha"
 },
In this example I’m using MVC 6 but SaasKit will work with any ASP.NET Core application. Once done we need to tell SaasKit how to identify our tenants.
Tenant Identification
The first aspect of multi-tenancy is tenant identification - identifying tenants based on information available in the current request. This could be the hostname, current user or perhaps a custom HTTP header.
First we need to create a class that represents our tenant. This can be any POCO and there are no constraints enforced by SaasKit:
public class AppTenant
{
    public string Name { get; set; }
    public string[] Hostnames { get; set; }
}
Next we need to tell SaasKit how to resolve a tenant from the current request. We do this by creating a tenant resolver. This should return a TenantContext<TTenant> instance if a matching tenant is found:
public class AppTenantResolver : ITenantResolver<AppTenant>
{
    IEnumerable<AppTenant> tenants = new List<AppTenant>(new[]
    {
        new AppTenant {
            Name = "Tenant 1",
            Hostnames = new[] { "localhost:6000", "localhost:6001" }
        },
        new AppTenant {
            Name = "Tenant 2",
            Hostnames = new[] { "localhost:6002" }
        }
    });

    public async Task<TenantContext<AppTenant>> ResolveAsync(HttpContext context)
    {
        TenantContext<AppTenant> tenantContext = null;

        var tenant = tenants.FirstOrDefault(t =>
            t.Hostnames.Any(h => h.Equals(context.Request.Host.Value.ToLower())));

        if (tenant != null)
        {
            tenantContext = new TenantContext<AppTenant>(tenant);
        }

        return tenantContext;
    }
}
Here we’re resolving tenants based on the hostname but notice that you have access to the full HttpContext so you can match on anything you like - URL, user, headers etc. I’ve hardcoded my tenants for now. In your own applications you’ll likely resolve tenants against a database or a configuration file.
Wiring it up
Once you’ve defined your tenant and tenant resolver you’re ready to wire up SaasKit. I’ve tried to follow the same pattern as most ASP.NET Core components. First you need to register SaasKit’s dependencies. Open up startups.cs and add the following to the ConfigureServices method:
public void ConfigureServices(IServiceCollection services)
{
    services.AddMultitenancy<AppTenant, AppTenantResolver>();
}
Then you need to register the SaasKit middleware components. Add the following to your Configure method:
public void Configure(IApplicationBuilder app, IHostingEnvironment env, ILoggerFactory loggerFactory)
{
    // after .UseStaticFiles()
    app.UseMultitenancy<AppTenant>();
    // before .UseMvc()
}
Getting the current tenant
Whenever you need the current tenant instance you can just take a dependency on your tenant type. For example in an MVC controller:
public class HomeController : Controller
{
    private AppTenant tenant;

    public HomeController(AppTenant tenant)
    {
        this.tenant = tenant;
    }
The same is true for TenantContext. SaasKit registers both of these dependencies for you so there’s no need to obtain the current HttpContext every time you need access to the current tenant. This makes your tenant-scoped dependencies much easier to test.
So that we can see everything is working, add the current tenant name to my site’s title. To do this I’m going to use a new feature of MVC6, the ability to inject services into views.
In _Layout.cshtml add the following to the top of the view:
@inject AppTenant Tenant;
This will inject AppTenant into the view and make it available on a property called Tenant.
Now we can use the tenant details in our view:
<a asp-controller="Home" asp-action="Index" class="navbar-brand">@Tenant.Name</a>
Running the example
Open project.json and update the web command to listen on the URLs configured for our tenants:
"commands": {
  "web": "Microsoft.AspNet.Server.Kestrel --server.urls=http://localhost:6000;http://localhost:6001;http://localhost:6002",
},
Now open up a console (cmd prompt) in the root of your project and run:
dnx web
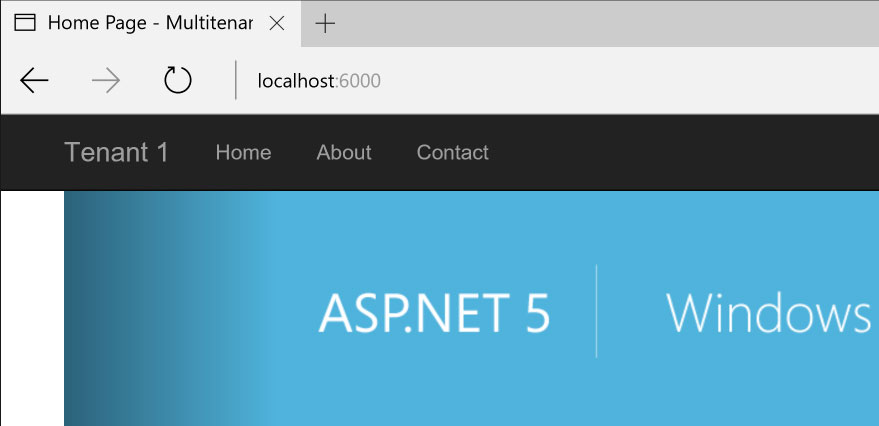
If I navigate to http://localhost:6000 and http://localhost:6001 (remember I mapped two hostnames to this tenant):
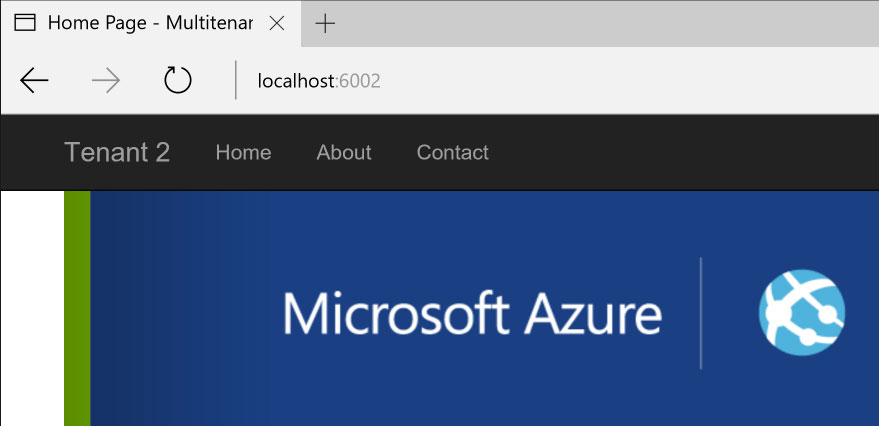
If I navigate to http://localhost:6001:
Making tenants configurable
Of course hardcoding tenants is pretty lame so we’ll update our sample to load the tenant details from appsettings.json using the new options pattern introduced in ASP.NET Core. To begin with add your tenant configuration to this file:
"Multitenancy": {
  "Tenants": [
    {
      "Name": "Tenant 1",
      "Hostnames": [
        "localhost:6000",
        "localhost:6001"
      ]
    },
    {
      "Name": "Tenant 2",
      "Hostnames": [
        "localhost:6002"
      ]
    }
  ]
}
Next we’ll define a class to represent our tenant options:
public class MultitenancyOptions
{
    public Collection<AppTenant> Tenants { get; set; }
}
Now we need to configure the options framework to bind values from from the configuration we created in Startup() (where we define appsettings.json). Add the following to ConfigureServices:
services.Configure<MultitenancyOptions>(Configuration.GetSection("Multitenancy"));
Then update our tenant resolver to get tenant information from MultitenancyOptions:
public class AppTenantResolver : ITenantResolver<AppTenant>
{
    private readonly IEnumerable<AppTenant> tenants;

    public AppTenantResolver(IOptions<MultitenancyOptions> options)
    {
        this.tenants = options.Value.Tenants;
    }

	public async Task<TenantContext<AppTenant>> ResolveAsync(HttpContext context)
    {
        TenantContext<AppTenant> tenantContext = null;

        var tenant = tenants.FirstOrDefault(t =>
            t.Hostnames.Any(h => h.Equals(context.Request.Host.Value.ToLower())));

        if (tenant != null)
        {
            tenantContext = new TenantContext<AppTenant>(tenant);
        }

        return Task.FromResult(tenantContext);
    }
}
Re-run the application and everything should work as before.
Wrapping up
The first step in building a multi-tenant application is deciding how you identify your tenants. SaasKit makes it easy to do this by resolving tenants on each request and making them injectable in your application.
Once you’re able to get the current tenant you can start to partition your services accordingly - from connecting to tenant-specific databases, rendering tenant specific views or overriding application components for each tenant.
In my next few blog posts I’ll cover more advanced multi-tenancy requirements so stay tuned.
Download
SaasKit is open source and available on GitHub. You can get the above example here.
Questions?
Join the SaasKit chat room on Gitter.
More content like this?
If you don’t have anything to contribute but are interested in where SaasKit is heading, please subscribe to the mailing list below. Emails won’t be frequent, only when we have something to show you.
Email Address